Shantanu's Blog
Database ConsultantApril 21, 2014
Install Joomla on centOS
1) install php and http
2) Download and extract joomla
3) Export path
4) Create symbolic link for mysql socket file
5) Disable selinux
6) Disable firewall
7) Start http deamon
8) Start TokuDB mysql
yum install php php-mysql http
cd /var/www/html/
mkdir joomla
cd joomla
wget http://joomlacode.org/gf/download/frsrelease/19239/158104/Joomla_3.2.3-Stable-Full_Package.zip
unzip Joomla_3.2.3-Stable-Full_Package.zip
export PATH=$PATH:/home/ec2-user/percona-5.5.30-tokudb-7.0.1-fedora-x86_64/bin
ln -s /var/lib/mysql/mysql.sock /tmp/mysql.sock
echo 0 >/selinux/enforce
vi /etc/sysconfig/selinux
SELINUX=disabled
service iptables stop
/etc/init.d/httpd start
cd /home/ec2-user/percona-5.5.30-tokudb-7.0.1-fedora-x86_64/
./bin/mysqld_safe &
mysql>grant all on *.* to 'joomla'@'localhost' identified by 'joomla' with grant option;
grant all on *.* to 'joomla'@'%' identified by 'joomla' with grant option;
December 13, 2012
Drupal site in 4 clicks
1) Log in aws console and go to CloudFormation Management Console. Click on "Create Stack" button.
2) admin/ admin is the default DB user name and password. You can specify the instance type (for e.g. m1.small)
Within a few minutes the site is ready!
This however, does not give you shell access to the ec2 instance. You need to create the drupal site based on a template in order to gain the root access.
http://aws.amazon.com/cloudformation/aws-cloudformation-templates/
Use the template that says: "Single EC2 Instance with local MySQL database"
You will be allowed to specify the kye pair that can be used to connect to the ec2.
This applies to Drupal, Joomla, Wordpress etc. Amazon ec2 instances are a bit costlier than the shared hosting. But I think aws is a good choice considering the host of features offered, reliability, support and brand.
Labels: aws, drupal, mysql, php, unicode, usability
June 11, 2007
Drupal Checklist
- Select your favorite theme for e.g. “bluemarine” and then click on Configure to add search box. Select "Use the default logo", Add custom logos and also Deselect page, story under "Display post information on"
- Administer - Site configuration - Site information - Name - Syntax Chemicals and Footer - Footer message
- Administer – User Management - User settings - select "Only site admins can create new user accounts" and Deselect "Require e-mail verification"
- Administer – User Management - Roles - Create a role "permanent" and "Temporary" and edit permissions accordingly.
- Administer – User Management - Users - Add user
- Administer – User Management - Access control - Deselct "access content" for annonymous users
- Administer – Content Management – Post settings – Number of posts – 1 Length: unlimited
- Administer – Site configuration – Input formats – Select PHP Code or full HTML as default
- Create a few stories and pages using the “create content link”. Link the stories to the Navigation Menus
- Administer - Site building – Menu – Update primary and navigation menus
- Administer - Site building - Modules - Make sure "Profile" is selected.
- Administer - User management - Profiles - single-line textfield - to create address profile.
- Administer – Content Management – Categories – Add Vocabulary – For e.g. Page type, Add term like facilities
Labels: drupal
Drupal External Modules
1) Front Page Module : can be installed to redirect the user to a different page based on different criterion.
Administer - Site building - Modules - Select "Front page"
global $user;
$sql_profile_check = db_query("SELECT * FROM {profile_values} WHERE fid = 8 AND uid = %d", $user->uid);
if (db_affected_rows($sql_profile_check)== 0 ) {
return 'user/' . $user->uid . '/edit/Details' ; //put once only destination here, this takes you to Profile
} else {
return 'user/'.$user->uid ; // put normal login destination here
}
2. Image Module : is required to be installed for the site where you want the user to upload and manage photos.
3. Regcode module : can be used if you want to send the registration code offline for better security
4. CCK module : To design custom form for e.g. “Repair Order Status”
5. Nodeaccess module : can be used to give restricted access to the “Verified users” to read all tickets but update only their own tickets.
Labels: drupal
June 10, 2007
Drupal Optional Modules
1) Aggregator: Aggregates syndicated content (RSS, RDF, and Atom feeds).
2) Blog: Enables keeping easily and regularly updated user web pages or blogs.
3) Blog API: Allows users to post content using applications that support XML-RPC blog APIs.
4) Book: Allows users to collaboratively author a book.
5) Color: (Default: selected) Allows the user to change the color scheme of certain themes.
6) Comment: (Default: selected) Allows users to comment on and discuss published content. Required by - Forum (disabled)
7) Contact: Enables the use of both personal and site-wide contact forms.
8) Drupal: Lets you register your site with a central server and improve ranking of Drupal projects by posting information on your installed modules and themes.
9) Forum: Enables threaded discussions about general topics. Depends on - Taxonomy (enabled), Comment (enabled)
10) Help: (Default: selected) Manages the display of online help.
11) Legacy: Provides legacy handlers for upgrades from older Drupal installations.
12) Locale: Enables the translation of the user interface to languages other than English.
13) Menu: (Default: selected) Allows administrators to customize the site navigation menu.
14) Path: Allows users to rename URLs.
15) Ping: Alerts other sites when your site has been updated.
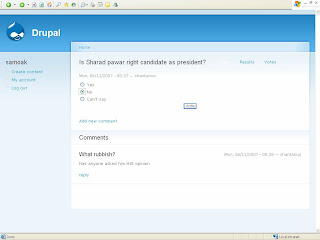
16) Poll: Allows your site to capture votes on different topics in the form of multiple choice questions.
17) Profile: Supports configurable user profiles.
18) Search: Enables site-wide keyword searching.
19) Statistics: Logs access statistics for your site.
20) Taxonomy: (Default: selected) Enables the categorization of content. Required by - Forum (disabled)
21) Throttle: Handles the auto-throttling mechanism, to control site congestion.
22) Tracker: Enables tracking of recent posts for users.
23) Upload: Allows users to upload and attach files to content.
a) Color, Comments, Help, Menu and Taxonomy are selected by default.
b) I will recommend to enable Profile, Tracker, Upload and polls to enable user participation. You can ofcourse decide the type of user who will have access to these features. for e.g. employees, editors etc.
i) Profile enables you to add more fields to the user page like, college, City etc.
ii) Tracker keeps log of the comments, stories submitted by the registered user.
iii) upload modules as the name suggests, allows users to upload pdf, media files.
iv) Polls are another good example of user particiation. Everyone likes to express his/ her opinion on all the issues of the world. Let's ask the public what they think about presidential candidate. See the screenshot below.

c) I will also recommend to enable Search and Ping modules to make the site searchable and automatically indexed by serach engines.
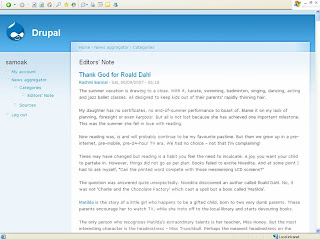
d) You can also enable Aggregator module to add external blog entries to the registered users account. For e.g. you can add Rashmi Bansal's blog entries directly into the navigation menu of the Registered users as shown in the picture. To enable this feature,
i) Administer - User Management - aggregator module - access news feeds - Select "authonticated user" or "Annonymous" as well if you want.
ii) Administer - Content management - Add category - Title: "Editor's note"
iii) Administer - Content management - Add feed - Title : "Rashmi", URL: "http://youthcurry.blogspot.com/atom.xml", Category: "Editor's note"

e) Blog and Forum are essentially just another content type like page and story. Since "story" content type works exactly like blog or forum, dont' select it.
Labels: drupal
April 19, 2007
Drupal localization
1) Administer - Site Building - Modules - enable "Locale" module

2) Administer - Site Configuration - Localization - Add Language - Marathi
3) Administer - Site Configuration - Localization - Import - Browse...
Select the mr.po file that you have downloaded and unzipped from
http://ftp.osuosl.org/pub/drupal/files/projects/mr-5.x-1.0.tar.gz
Right click the above link and choose "Save as..."

4) Enable Marathi and make it default interface.

5) To enable typing in Devnagari, download and unzip the file from...
http://ftp.osuosl.org/pub/drupal/files/projects/unisaraswati-5.x-1.0.tar.gz
Copy the unisarawati folder in the modules folder under drupal directory. Enable the module by navigating to Administer - Site Building - Modules. Decide where should be the Devnagari / Roman option should be displayed by going to Administer - Blocks. You can use the F12 key to toggle the input method from Devnagari to Roman.
Labels: drupal, unicode, usability
Archives
June 2001 July 2001 January 2003 May 2003 September 2003 October 2003 December 2003 January 2004 February 2004 March 2004 April 2004 May 2004 June 2004 July 2004 August 2004 September 2004 October 2004 November 2004 December 2004 January 2005 February 2005 March 2005 April 2005 May 2005 June 2005 July 2005 August 2005 September 2005 October 2005 November 2005 December 2005 January 2006 February 2006 March 2006 April 2006 May 2006 June 2006 July 2006 August 2006 September 2006 October 2006 November 2006 December 2006 January 2007 February 2007 March 2007 April 2007 June 2007 July 2007 August 2007 September 2007 October 2007 November 2007 December 2007 January 2008 February 2008 March 2008 April 2008 July 2008 August 2008 September 2008 October 2008 November 2008 December 2008 January 2009 February 2009 March 2009 April 2009 May 2009 June 2009 July 2009 August 2009 September 2009 October 2009 November 2009 December 2009 January 2010 February 2010 March 2010 April 2010 May 2010 June 2010 July 2010 August 2010 September 2010 October 2010 November 2010 December 2010 January 2011 February 2011 March 2011 April 2011 May 2011 June 2011 July 2011 August 2011 September 2011 October 2011 November 2011 December 2011 January 2012 February 2012 March 2012 April 2012 May 2012 June 2012 July 2012 August 2012 October 2012 November 2012 December 2012 January 2013 February 2013 March 2013 April 2013 May 2013 June 2013 July 2013 September 2013 October 2013 January 2014 March 2014 April 2014 May 2014 July 2014 August 2014 September 2014 October 2014 November 2014 December 2014 January 2015 February 2015 March 2015 April 2015 May 2015 June 2015 July 2015 August 2015 September 2015 January 2016 February 2016 March 2016 April 2016 May 2016 June 2016 July 2016 August 2016 September 2016 October 2016 November 2016 December 2016 January 2017 February 2017 April 2017 May 2017 June 2017 July 2017 August 2017 September 2017 October 2017 November 2017 December 2017 February 2018 March 2018 April 2018 May 2018 June 2018 July 2018 August 2018 September 2018 October 2018 November 2018 December 2018 January 2019 February 2019 March 2019 April 2019 May 2019 July 2019 August 2019 September 2019 October 2019 November 2019 December 2019 January 2020 February 2020 March 2020 April 2020 May 2020 July 2020 August 2020 September 2020 October 2020 December 2020 January 2021 April 2021 May 2021 July 2021 September 2021 March 2022 October 2022 November 2022 March 2023 April 2023 July 2023 September 2023 October 2023 November 2023 April 2024 May 2024 June 2024 August 2024 September 2024 October 2024 November 2024 December 2024 January 2025 February 2025 April 2025 June 2025 July 2025 August 2025


